How to Consolidate Customer and Vendor Balances in Business Central

Understand that some customer of the company might be the vendor of the company too. There is a feature in Business Central that allows users to consolidate both customer and vendor balances without making unnecessary payment or receipts.


Prerequisite Setup for Customer and Vendor Consolidation

Page: Marketing Setup

        1.       Setup a Business Relation Code for each Customers and Vendors.


        2.       Assign a number series under Contact Nos. A number will be pickup from the number series when there is a new Contact code created.


To Link the Relation between Customer Card and Vendor Card

1.       Go to Customer Card, look for the customer that you need to link in Customer Contact.


2.       Confirm the Customer Name that you have selected.


3.       Link with the Customer with existing Vendor.

(Path: Actions > Functions > Link with Existing > Vendor)


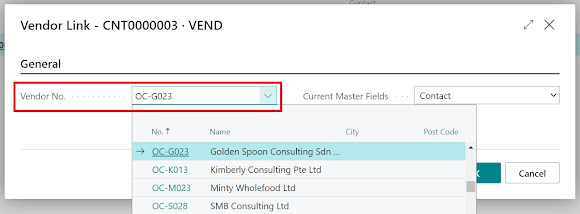
4.       Select the Vendor No. from the vendor listing to link.


5.       The Contact Business Relation status should have changed from Customer to Multiple.


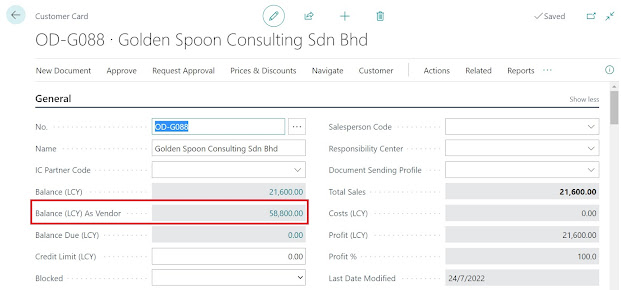
6.       You can now see the balance from Vendor Ledger in Customer Card.


7.       Same goes in Vendor Card, you will be able to see the balance of the Customer Ledger.


Take note that you can also do it another way around which is linking business relation from Vendor Card.


Customer and Vendor Consolidation


Page: Payment Journal


1.       To consolidate the documents of same vendor and customer, you will need to do it in Payment Journal page. Select “Net Customer/Vendor Balances” from Prepare.


2.       Select Vendor No. that need to be consolidated, then select OK to proceed.


3.       The offset entries will be automatically created.


Comments

Popular posts from this blog

How to Correct Dimensions in Business Central

  It is quite common that users might find out that some entries might mistakenly charge to wrong dimension, which will cause inaccurate financial reporting and analysis. The classic method of rectifying this type of error is to create a manual general journal entry to reverse it. One of the popular features which available in Business Central is “ Correction Dimension ” where it allows you to correct the dimension values in General Ledger Entries age in a simple way.     Important Note 1 : Dimension Correction apply only G/L entries. They do not change the dimensions that assigned in other ledgers for the same transaction. There will be mismatch between the dimensions assigned in the general ledger and the sub-ledgers. Important Note 2 : If you need to do Dimension Correction in a large scale, say more than 100 transactions, it is advised to schedule or perform during the non-peak hours as it may cause Table Locking during posting of other transactions by other users.   Page

How to Reverse Posted Documents in Business Central

  If you need to amend or change a posted documents in Business Central, there are few ways to do it instead of having you to manually create a reversal journal or Credit Memo to rectify a Posted Document. Before you proceed to Correct or Cancel any document that posted in Business Central, you need to identify the origin of the posted document, as the method of cancellation depends on the document type.   There are 2 types of documents that posted in Business Central. i.                      Journals – E.g., General Journals, Purchase Journals, Payment Journals, Sales Journals, Receipt Journals etc. ii.                    Documents – E.g., Purchase Invoice, Purchase Credit Memo, Sales Invoice, Sales Credit Memo etc.   A.       A.     C orrecting or Cancelling Journals 1.       You can “Reverse” the posted journals in General Ledger Entries page. Page: Search > General Ledger Entries   2.   Select the entry that needs to be cancelled or corrected, then select R

Why business central fixed asset depreciation amount is different from my calculation

  Upon data migration to Business Central, customers often wonder why the monthly depreciation amount is different from their calculations. The only explanation we've identified so far is that the data provided for the migration inadvertently caused either over- or under-depreciation of depreciation amounts. The following example illustrates how BC's depreciation amount will differ from your calculated amount.           1.        The following asset was migrated to BC with the cut-off date till 31 st August 2022.           2.        You can print the Projected Value report to check on the future depreciation and book value of the asset. Page: Projected Value           3.        According to your book, the trend of monthly depreciation from now until December 31, 2022 is $1,000, but BC is recording $1,500 rather than your calculated amount. You can check the comparison below between BC and your migrated data to see how BC came up with the amount. Noticed that the migrat